
Solo Developers Need Source Control
Note: This article mainly addresses Mac and iOS programmers, but the first half applies to all developers, maybe even to writers.
I have a number of friends who are solo developers and are surprised to hear I use version control even on projects where I am the sole developer. They just duplicate the project folder for each release or major milestone. Why do I go through the hassle?
But you see, it’s not a hassle. It actually saves me blood, sweat and tears. Let’s go into why:
Why Source Control as a Solo Developer?
Unlimited Undo
Every time I do something in my code that I consider a success, or that just completes a step, I make a commit. Be it a small thing, like “added that one call with the insanely long constructor call that would be annoying to type again”, or a milestone like “finished implementing new feature X”.
How often does it happen to you that you write code that should work, but for some mysterious reason doesn’t? Then you start fiddling with things. Add log messages, try if it works when you use a different parameter here or there, whatever. In the end, it’s often a typo. Extra semicolon after an if. By the time you find that, your code looks like a mess.
But I used version control! I made a commit! I can simply revert all the changes I did to the state before my experiments, delete that one extra semicolon and my code is clean again.
What if the fix I need is slightly larger, and I can’t revert it all and re-type? Version control knows what I changed! It can still show me only my changed files, and highlight which lines I changed. It’s much faster to find all spots and selectively discard only the debug logs and the nonsense I tried.
Even better, if I’m not sure whether a particular change is really necessary for the fix to work, I am now reminded I made that change. I can comment it out, test again, and delete it if it turns out to be unneeded.
Source Control is like unlimited undo, plus checkpointing!
Also, compared to duplicating the folder I’m working in every time, it is faster. Source control just copies the changed files, even only the particular lines that changed. It also compresses its repository. I don’t copy all my app’s resources and sound files and XIBs every time I want to lock down the state of main.swift. I can do this for every line, if I wanted to.
Additional Documentation
Admit it, we all forget to comment something non-obvious occasionally. A workaround is obvious at the time of writing. By making a commit and typing a commit message, every line that is part of a particular change is marked as such. Git keeps track of it. You type in “fixed bug with time-outs from RouterWorks devices”. Two years later, when you wonder why this weird call is in that function, you can call up the Authors view in Xcode and see that message again next to this line, even if all the other lines and the comment explaining what they’re for have already been deleted.
Also, it helps you collect your thoughts and review your code quality. Every time you write a commit message, you have the opportunity to go through the changes you just made and revisit the thoughts that went into it. Do my assumptions hold? Do these changes, seen as only the lines I just changed, still make sense in that context?
And it helps you the next day when picking up work where you left off. “What was I doing yesterday?” Becomes easy to answer. You’re saving yourself the hassle of keeping a to-do-list. I often even write little to-do’s in the commit messages, like “Implemented parsing of data types, but we still need to actually hand that info to the code generator.”
Keeping Perfectly Good but Unused Code
Programmers have a love/hate relationship with code. Having lots of it is a burden: You need to sift through more lines to find the spot you want to work on, more code means more opportunities for bugs. On the other hand, we love a good function that elegantly pulls off a task.
So what if we no longer need a function? Keep it around in case we need it later and incur the extra weight on our codebase? Delete it and risk having to write it again? With Source Control, I have my cake and delete it, too: The function is in version control. I can delete it, and if, in a year, I need a function like it, I can go back, see where I deleted that function, and just resurrect that code from the repository.
Fixing Bugs in 1.0 while Working on 2.0
You’ve shipped 1.8. You’re a month into work on 2.0 when an online service your app talks to deprecates the API you’re using. You can’t ship 2.0 now! It is still too much in flux, with some important features removed but not yet rewritten, other features just too buggy to ship, and half-finished new features in every menu and window. So you gotta go back and do a 1.8.1.
Without version control, you probably made a copy of the code when you submitted 1.8 to the App Store. So you go back and get the exact code that you shipped as 1.8, and rewrite it to use the new API. You call that 1.8.1 and ship it. Your users are happy.
Now comes the tough part: You have two copies of your code now. 1.8.1 is old code, but has the new API calls. 2.0 is new, but still has the old API calls interleaved in the new code.
You can use FileMerge.app to compare the two folders, but you still need to sift through all the changes done for 2.0 to see the ones for 1.0, even with a three-way merge, this isn’t fun.
With Source Control, you can just tell it “Merge 1.8.1 into 2.0”. It will see that 2.0 was based on 1.8.0, so will take only the changes done to 1.8.1 since 1.8.0, and replay them on top of 2.0. Most of the time, that’s it. Your changes are there. Sometimes, you’ve deleted a source file or renamed it, or changed a different part of the same line in 2.0. Then it will see that it can’t just apply the fix, and point out a “conflict”. You will have to manually resolve that by looking at the diff, but only for the conflicting files, and for a much smaller set of changes.
Moreover, it will now know that 1.8.1 has been fully incorporated into 2.0. So if you need to release a 1.9, it will know only to apply those few changes from 1.8.1 to 1.9 when you merge them into 2.0. Without you telling it to.
Preventing Confusion in Other Apps
I mentioned above that a common technique of people who do not use Source Control is duplicating their project folder. The problem with that is that you end up with two copies of every file. Your Spotlight results are bound to get really bad, inundated with identical, indistinguishable filenames. Especially when working on both a hot fix (like 1.8.1 above) and the next big version (2.0 above), it’s easy to accidentally grab a file from the wrong folder, edit it and screw up your backup.
Unless you develop the discipline to zip your backups and delete the original folders. But then you still need to wait for all your images to be zipped each time.
With version control, only the current version you’re working on right now exists for all other applications. You select whatever version you want to work on today, and Source Control quickly swaps out only the changed files. Fewer files are touched, fewer bytes moved around, because Source Control can be smart. Source Control knows what you did, after all.
You can’t Delete Anything
The main purpose of version control is to prevent you from losing things. When you delete a line of code, it is gone, but only from the current version. All previous versions are still there, and contain it. In fact, most version control systems make it hard to permanently erase something from their history. Usually that’s reserved for a special “filter” operation that is intended for removing e.g. files accidentally checked in that you don’t have the rights to, or that contain confidential information like certificates or passwords that you didn’t mean to include.
This gives you peace of mind: No matter how badly you screw up, the previous version is still there. The amount of data you can lose or destroy is limited to the amount of data you added since the last commit. Anything you removed can be resurrected.
Off-Site Backups
Since source control is intended to be used collaboratively, it supports servers. You can rent a server quite cheaply, or even get space on a free source control hoster and upload your changes there. Your house burns down? That sucks, but while you rebuild, you can immediately resume earning money, because you have an off-site backup that’s current up to your last “push” to the server. Moreover, these are fast backups. This is not a general backup solution uploading every file with a new change date. This is source control knowing that you added four lines today and only sending those up to the server.
Multiple Computers
If you have multiple computers, for example a desktop and a notebook, or one at home and one at a co-working space, source control servers can also be useful. As long as you remember to send your changes to the server, you can always retrieve them on the other machine. If you do forget to commit or send something, source control will warn you, whereas just copying a folder to the notebook before travel will quietly overwrite some changes you forgot were on there.
Moreover, different from general file-synchronisation solutions, which usually do not know about the internal consistency requirements between the various files referencing each other in file packages like Xcode projects, source control will never corrupt your data. If your Dropbox folder doesn’t sync your last changes before you turn off your desktop, your files will not quietly be replaced by their newly-edited older versions from your Laptop when you boot it up again the next day.
But I’ll Need Another App to do Source Control!
Nope. At the time of this writing (Xcode 10), Xcode has a full source control client built in. Let’s see how one uses Source Control in Xcode:
Getting a repository
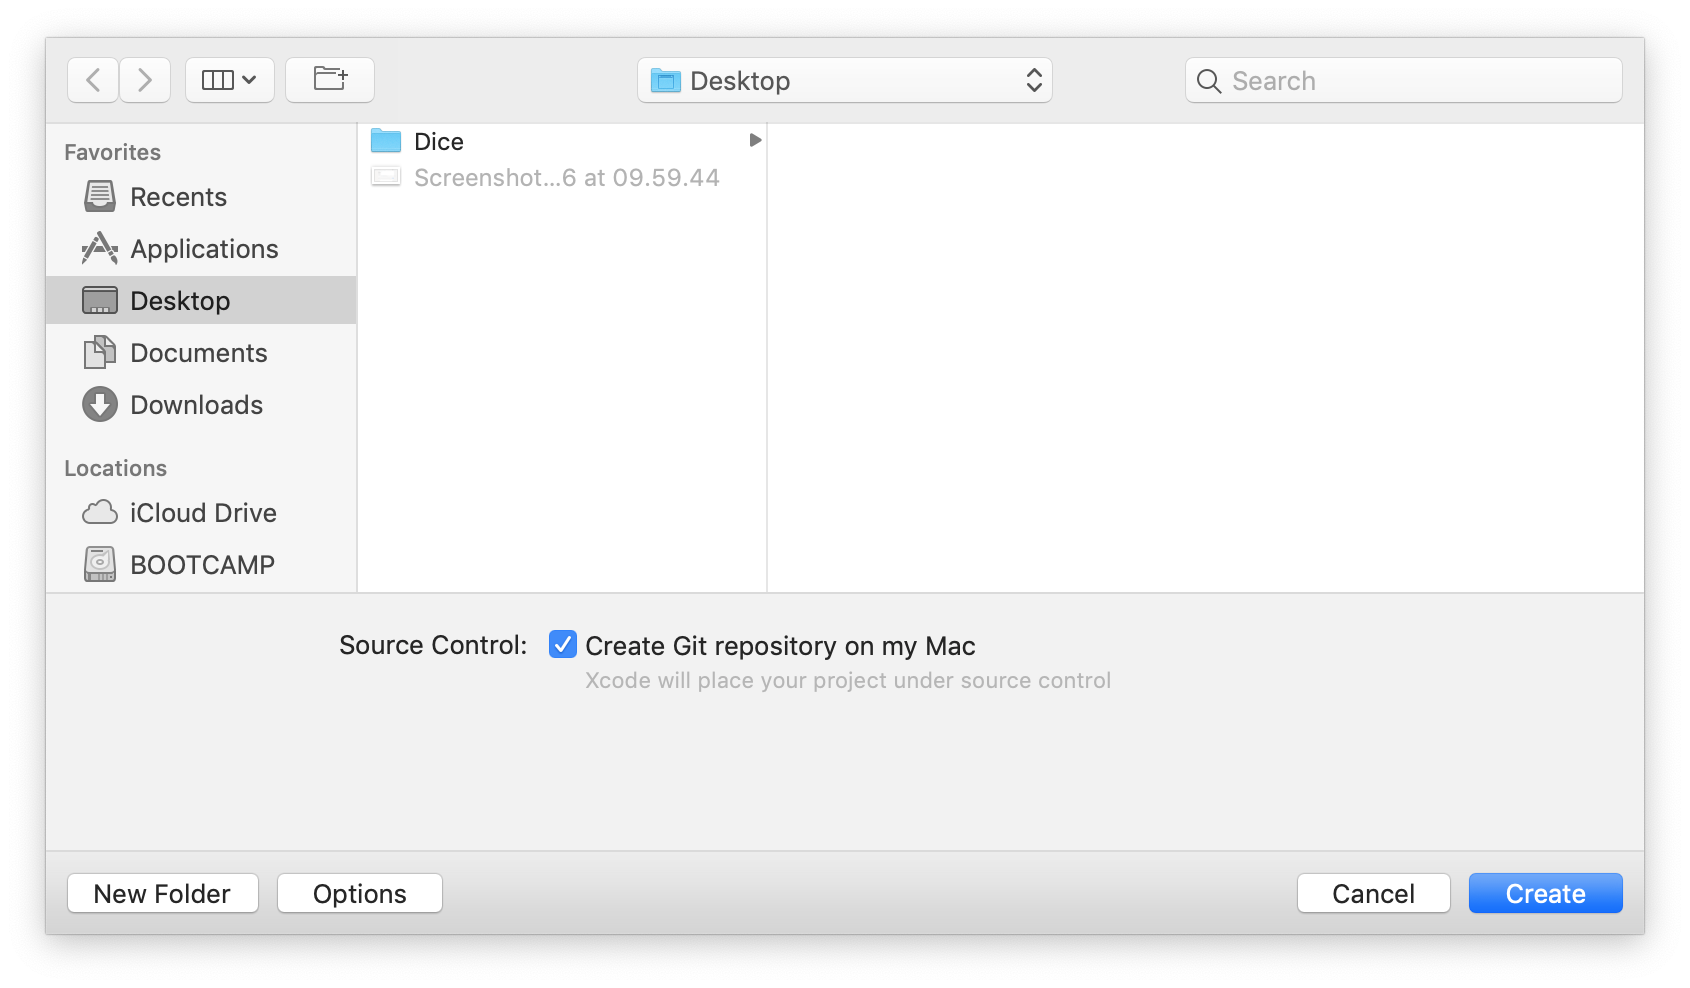
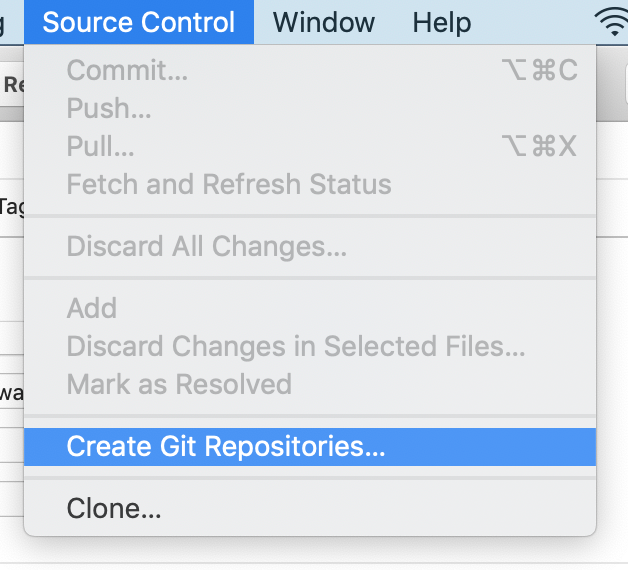
Whenever you create a new project, you can tick one checkbox to have it create a repository for you. If you have existing projects, choose Create Git Repositories… from the Source Control menu:
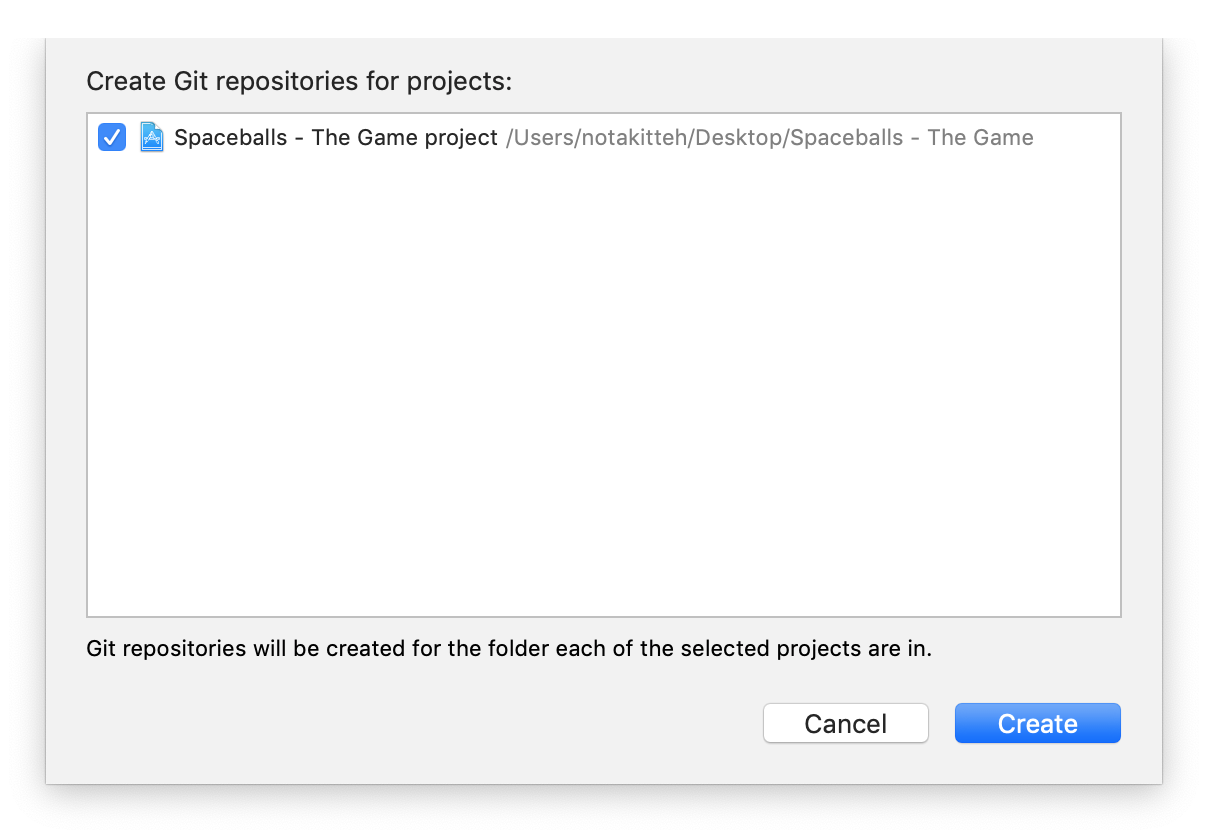
And use the resulting sheet to create the repository retroactively:
That repository will be in an invisible .git folder at the root of your project folder now.
Saving Progress
You can save your progress into it by choosing Commit… from the Source Control menu:
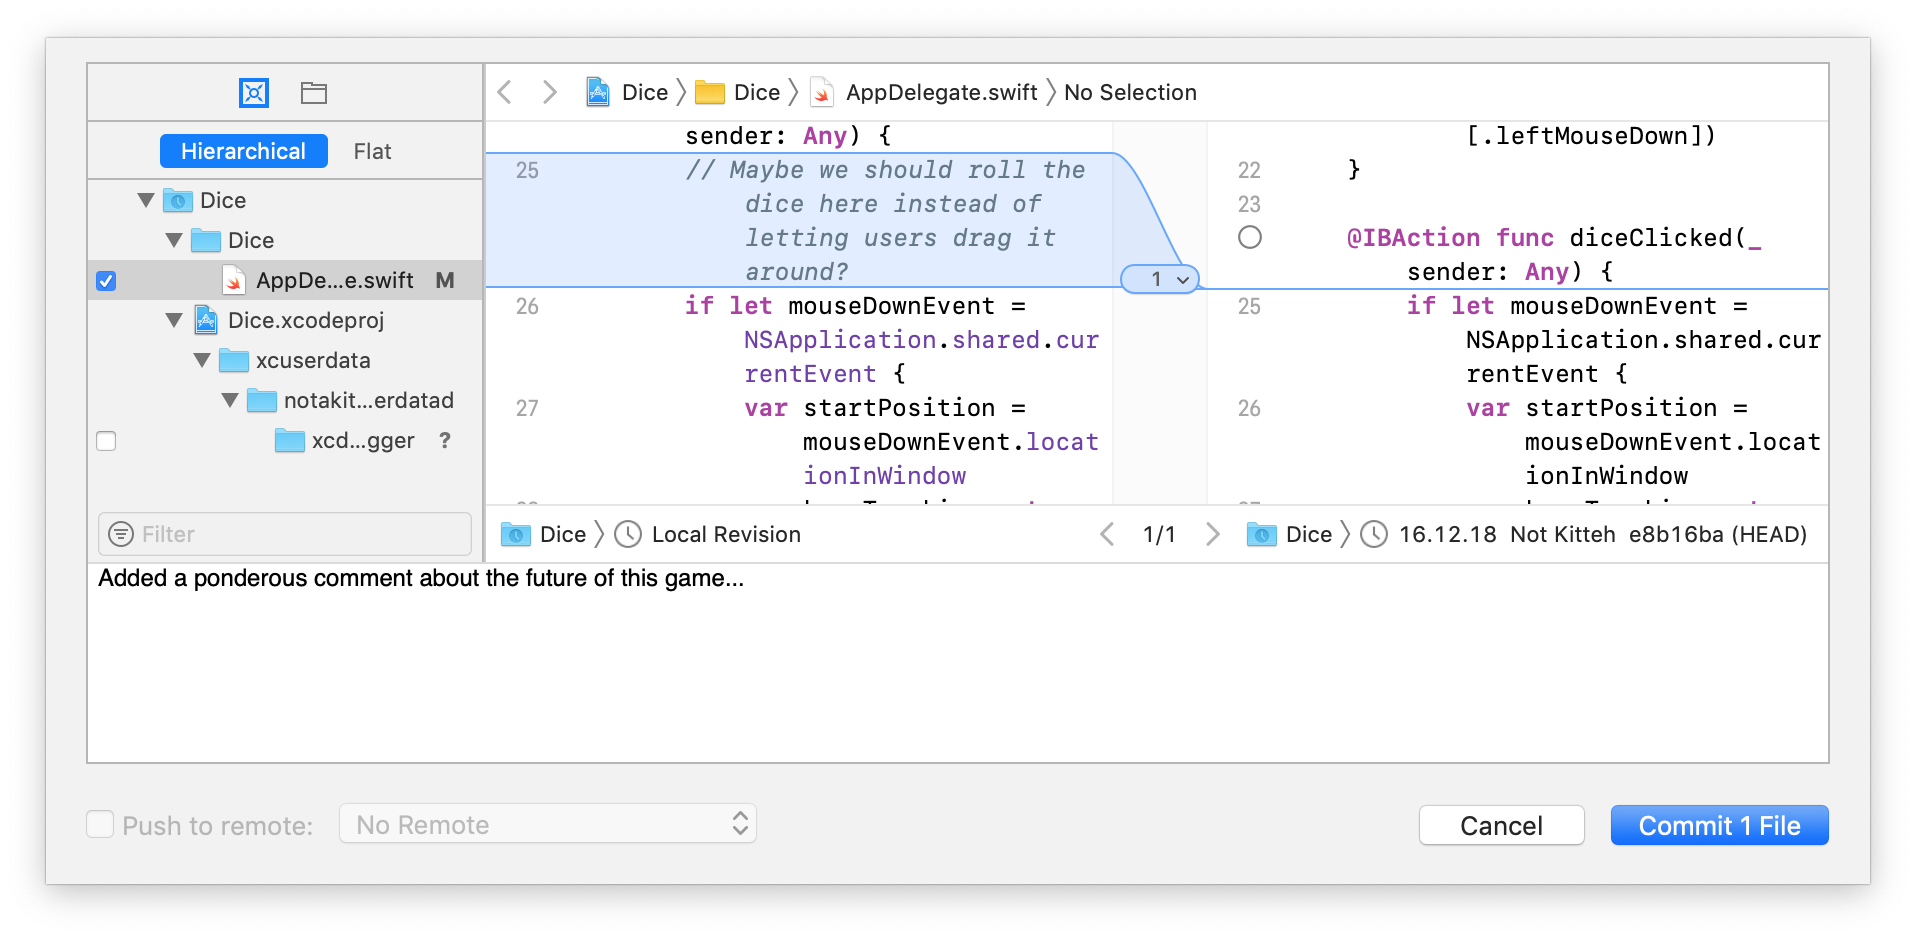
Add a short note why you made the changes, check the files to commit, maybe revert a few individual changes, and commit. Boom, you’ve saved your progress. To review your work, click on the Source Control Navigator icon. In the upper left of the sidebar:

Going Back to an Older Version
To go back to an older version, click the commit in the list and choose Checkout….
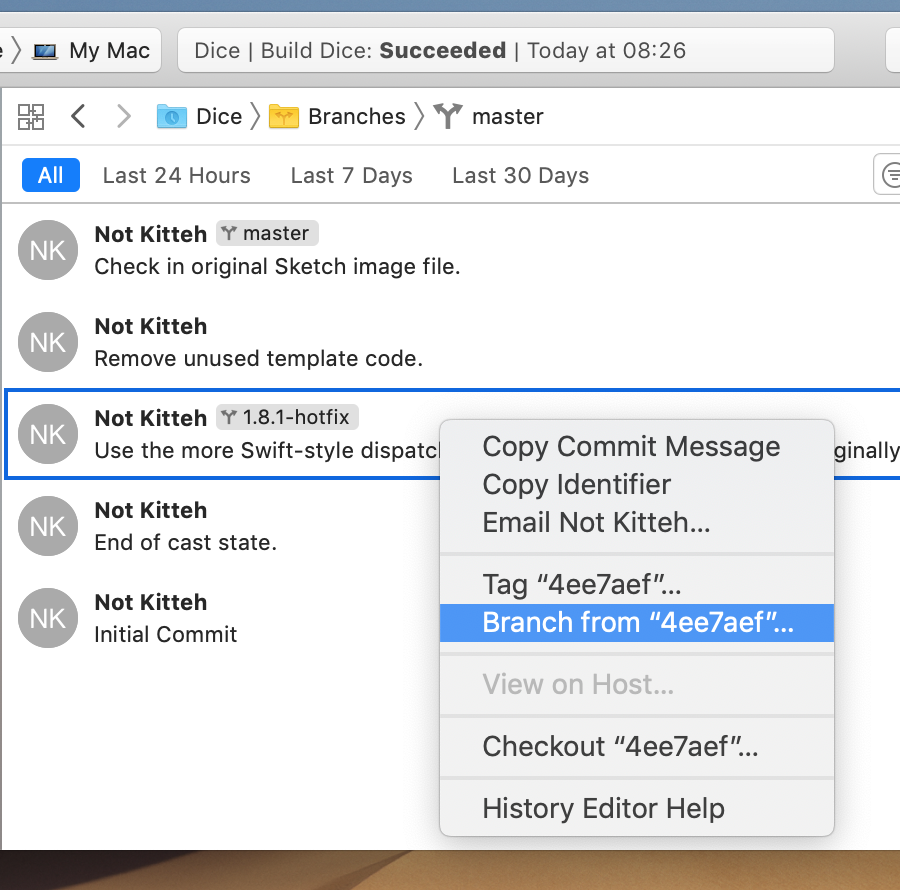
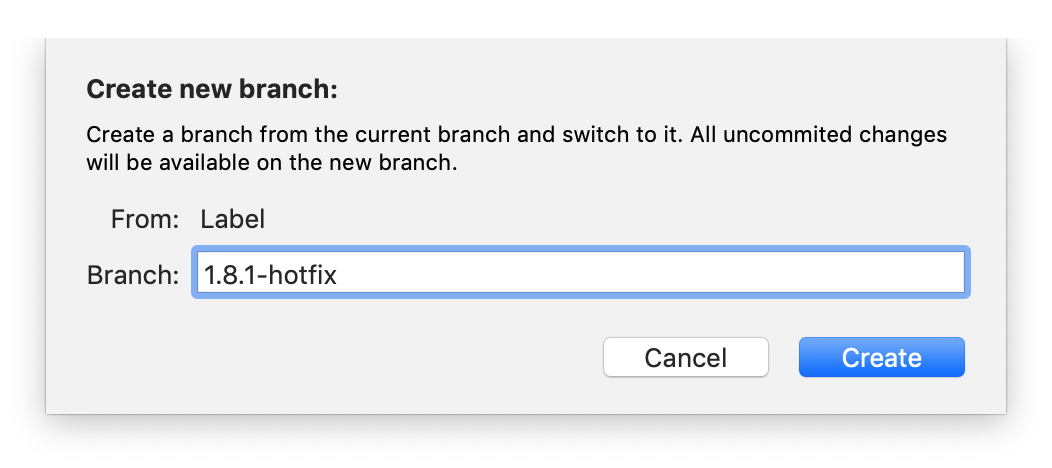
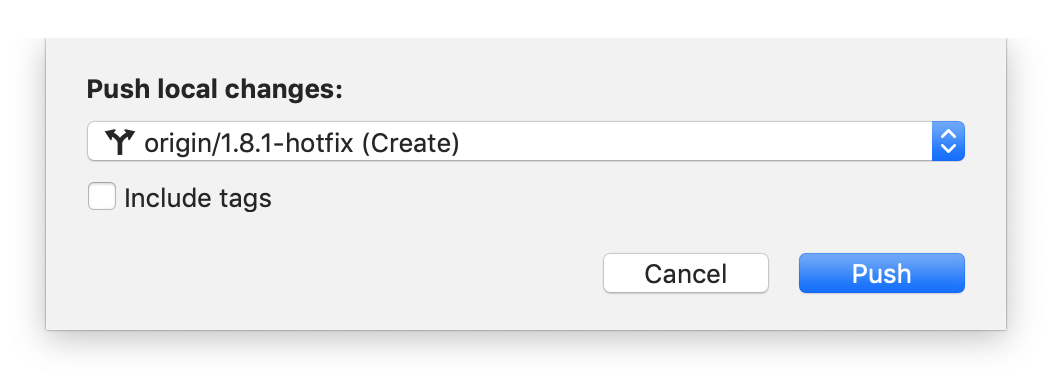
To create a new version of your entire project based on an older commit, right-click the commit in the list and choose Branch from "xxx"… (where the “xxx” is a unique identifier used for each commit internally by Git – you probably won’t need to bother with these SHA-1 hashes), and choose a descriptive name (like 1.8.1-hotfix).
Then right-click that branch in the Branches list on the left (Git calls these versions “branches” because the list of commits branches off into two lists when you do this) and select Checkout… to actually make that version active. The same approach goes for switching back to your original version (which, by convention, is named master in Git).
Merging
To re-integrate the changes from a branch, right-click it in the list and choose the appropriate “Merge…” contextual menu item.
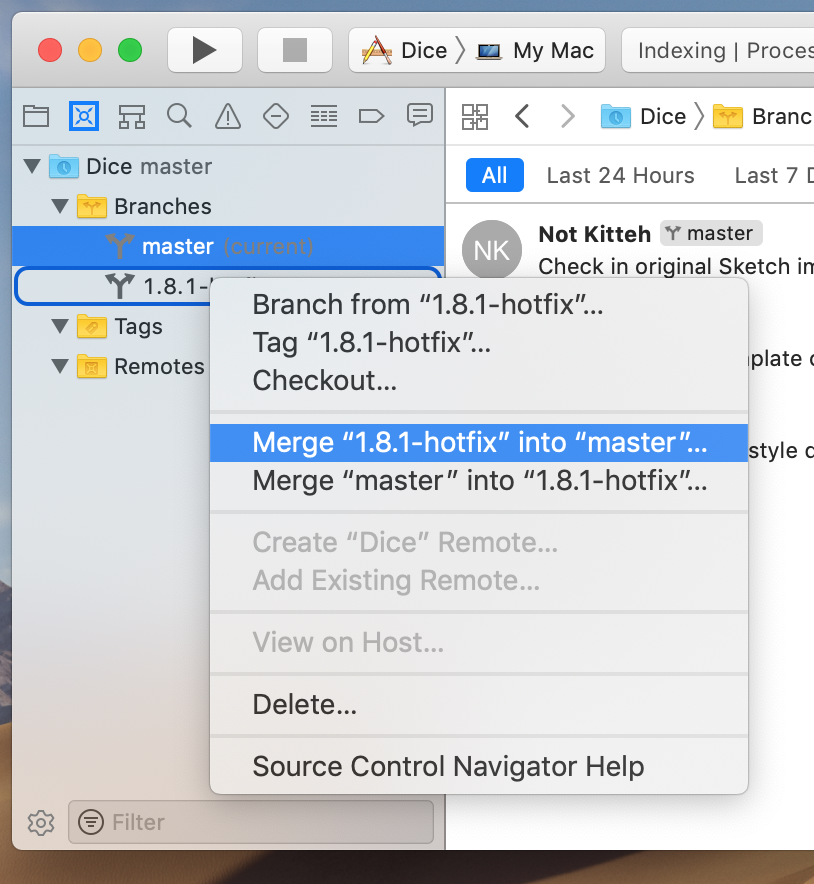
Usually, it is a good idea to switch to your destination branch first, then click the other branch and merge into yours. That way, Xcode knows which two branches are of interest right now, and you can immediately build and run the merged project to ensure everything merged correctly. (Merging may be easier with source control, but it is still the part of development where the computer needs the most hand-holding from a human)
Note that branches are useful anywhere a copy of your code would be useful. Experimenting in your code? Branch off and just never merge back, but still have the benefit of being able to come back to the experiment at will.
Merging is also useful beyond re-integrating changes from a branch into master. You can merge between any two branches. Many people create a new branch whenever they create a new feature, and only merge a feature-branch back into master when it is done. That way, master is not a graveyard of half-finished features, but always is in shippable shape.
Since a feature-branch may “live” a long time while other feature branches get merged back into master, you may occasionally want to merge master into the feature branch, to keep it up-to-date, and to keep the differences between master and your feature branch to those differences that happened in your feature. Also, many developers have a develop branch that most work happens on, that periodically gets merged into master. master is then reserved for shipping releases.
But those are just conventions and suggestions. As a solo developer, it is fine to just mess around on master, branch off when you do something especially dangerous, and occasionally apply a “tag” to a commit when you make a release. Source control is supposed to be a tool to help you, not a straight-jacket.
Using a Remote Server
I love that any code I work on gets backed up to Github. I can buy a new Mac or accidentally trash my entire hard disk, and be up and running again immediately after the system reinstall has finished.
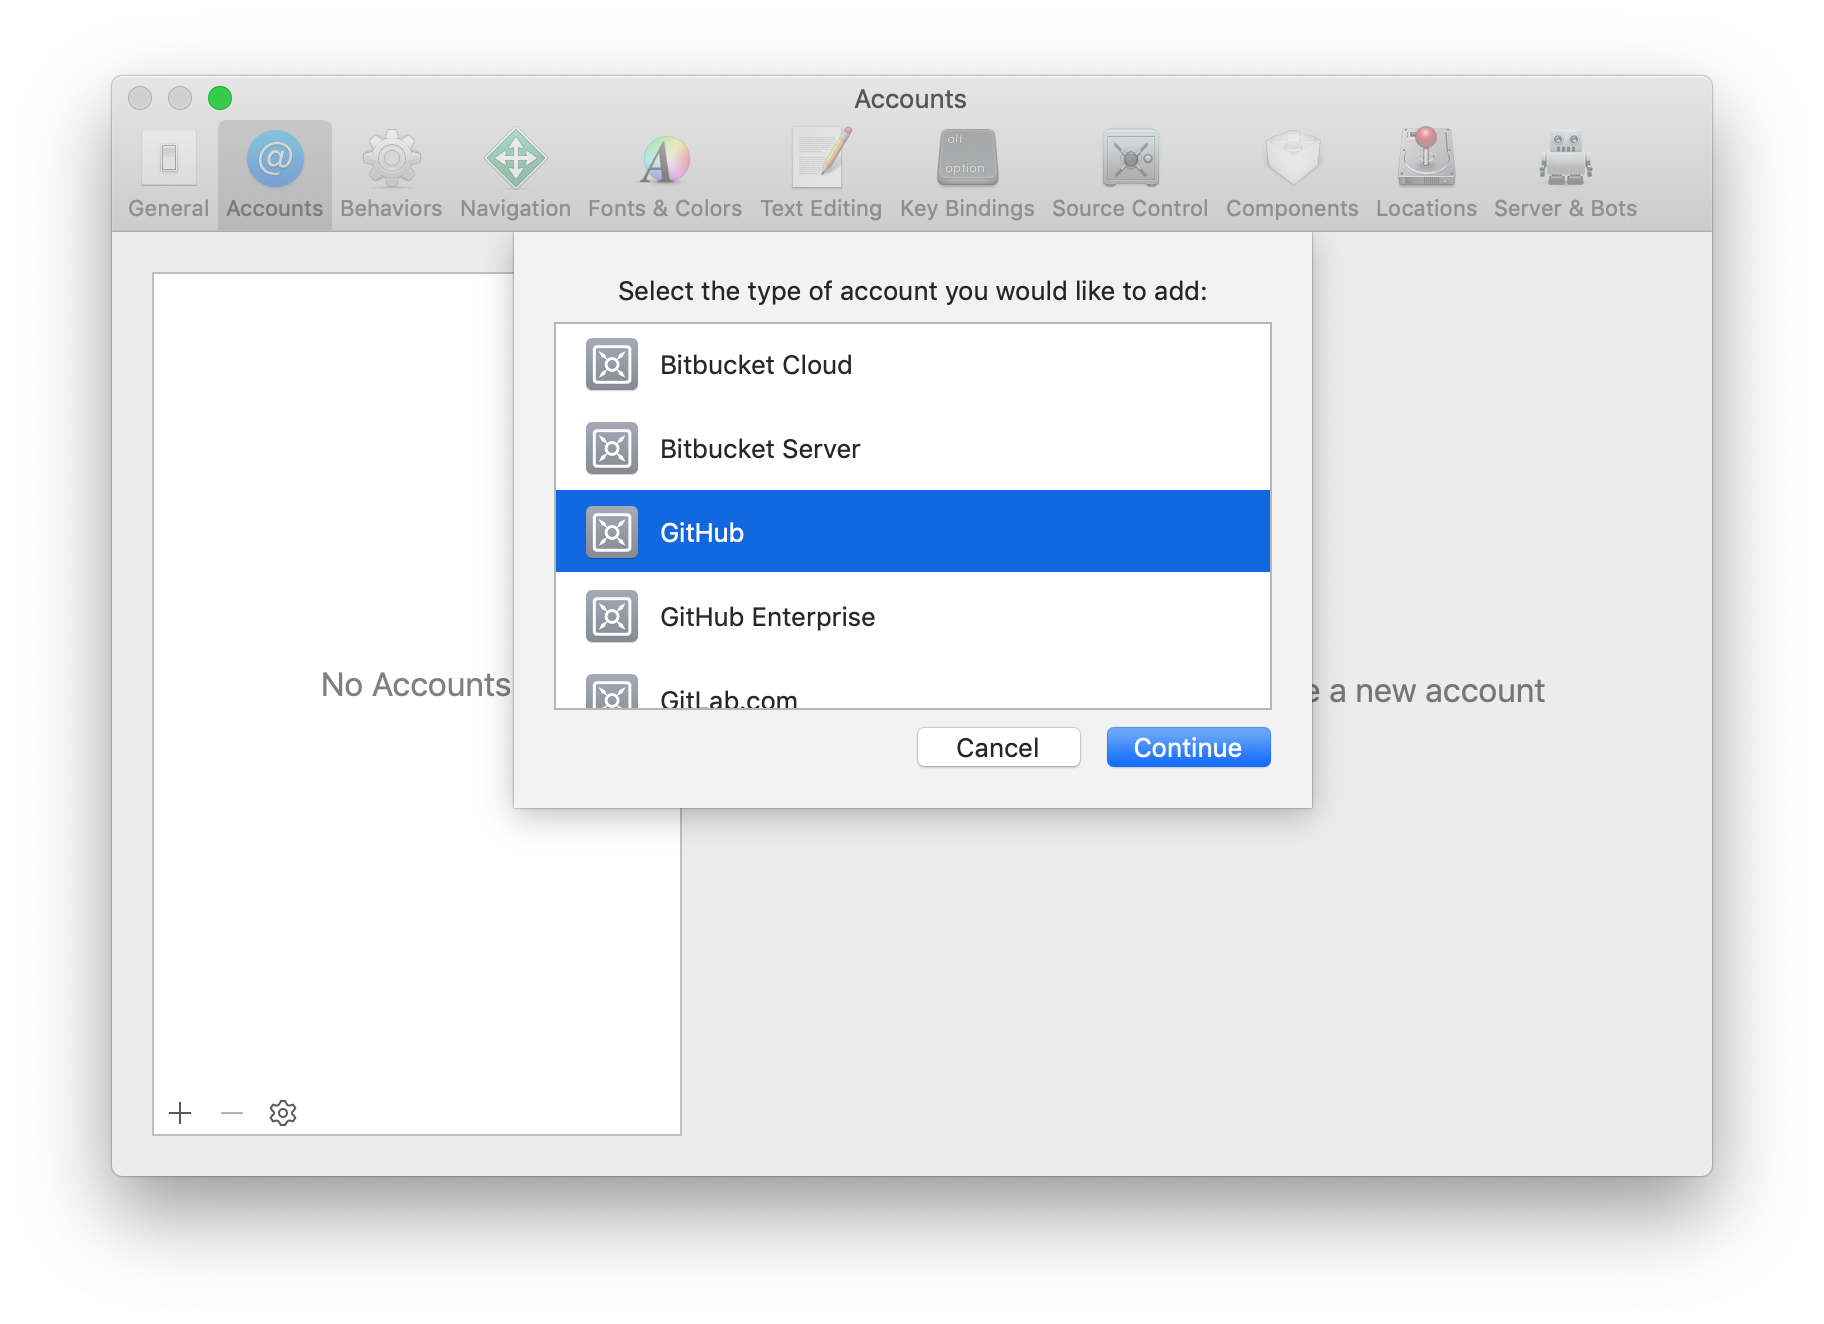
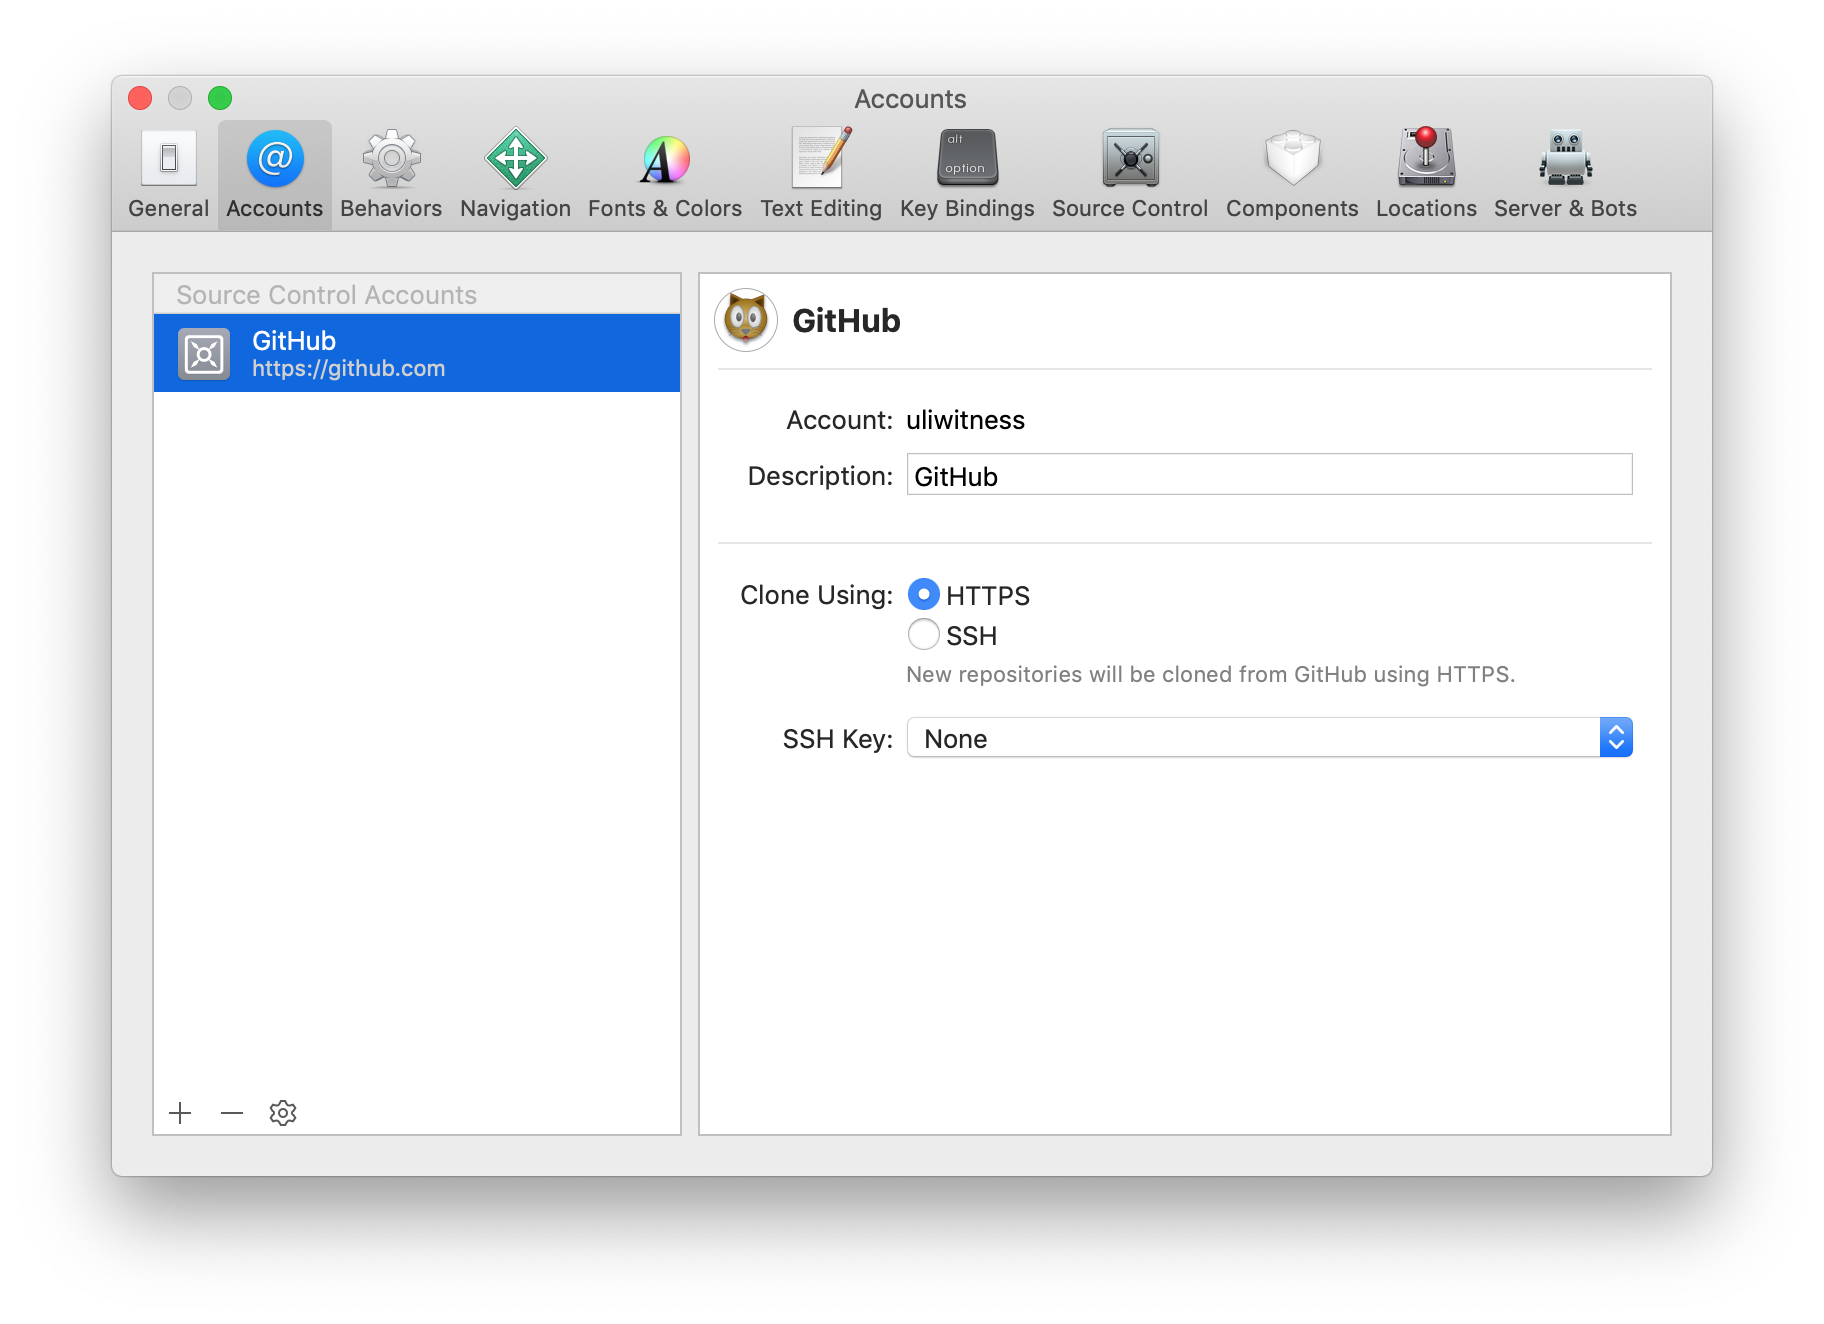
First thing I do is add the account for that Git server to Xcode under Accounts in the Preferences window:
Click the “+” button, enter your credentials:
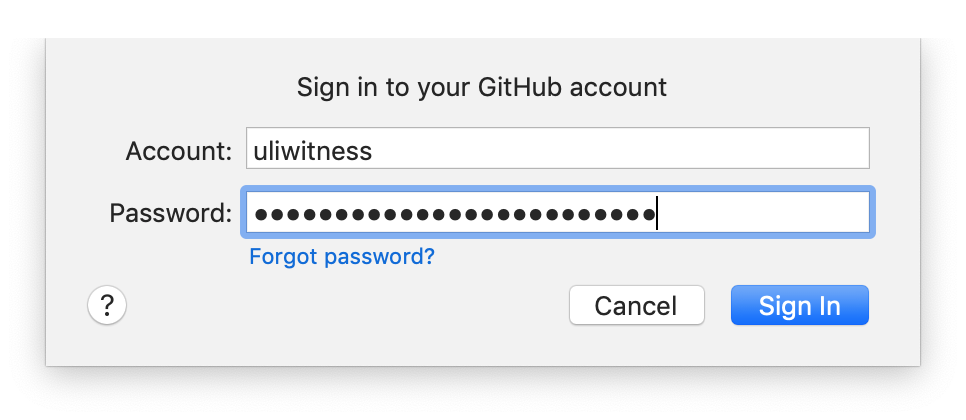
And presto, Xcode knows how to authenticate with your server:
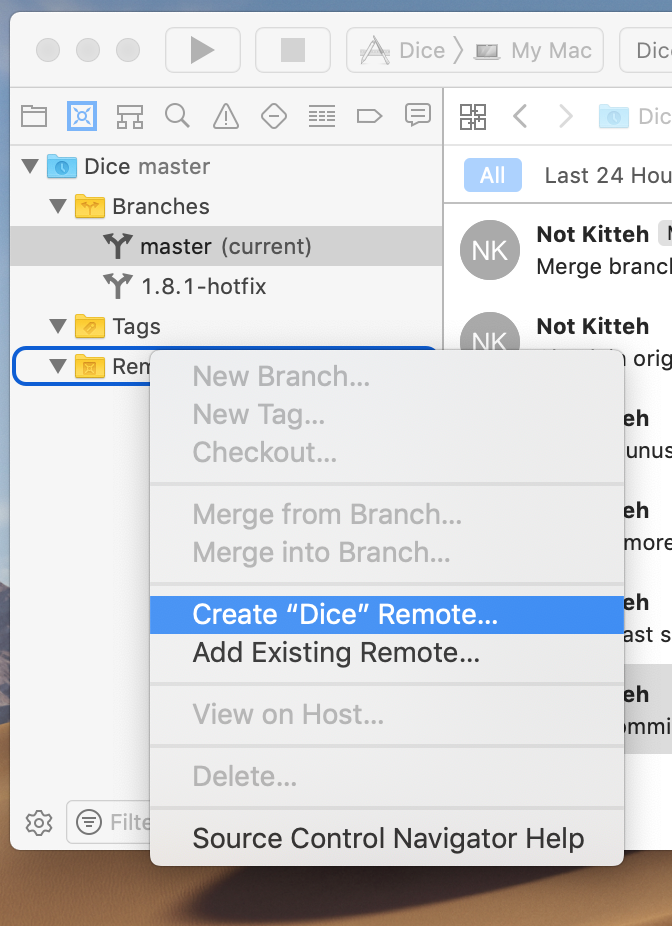
Now you only have to tell the repository to actually talk to that server, and to which repository on it. You do this by adding an entry to the “Remotes” list in the source control navigator by right-clicking the “Remotes” folder and choosing create remote (if you want Xcode to create the repository for you):
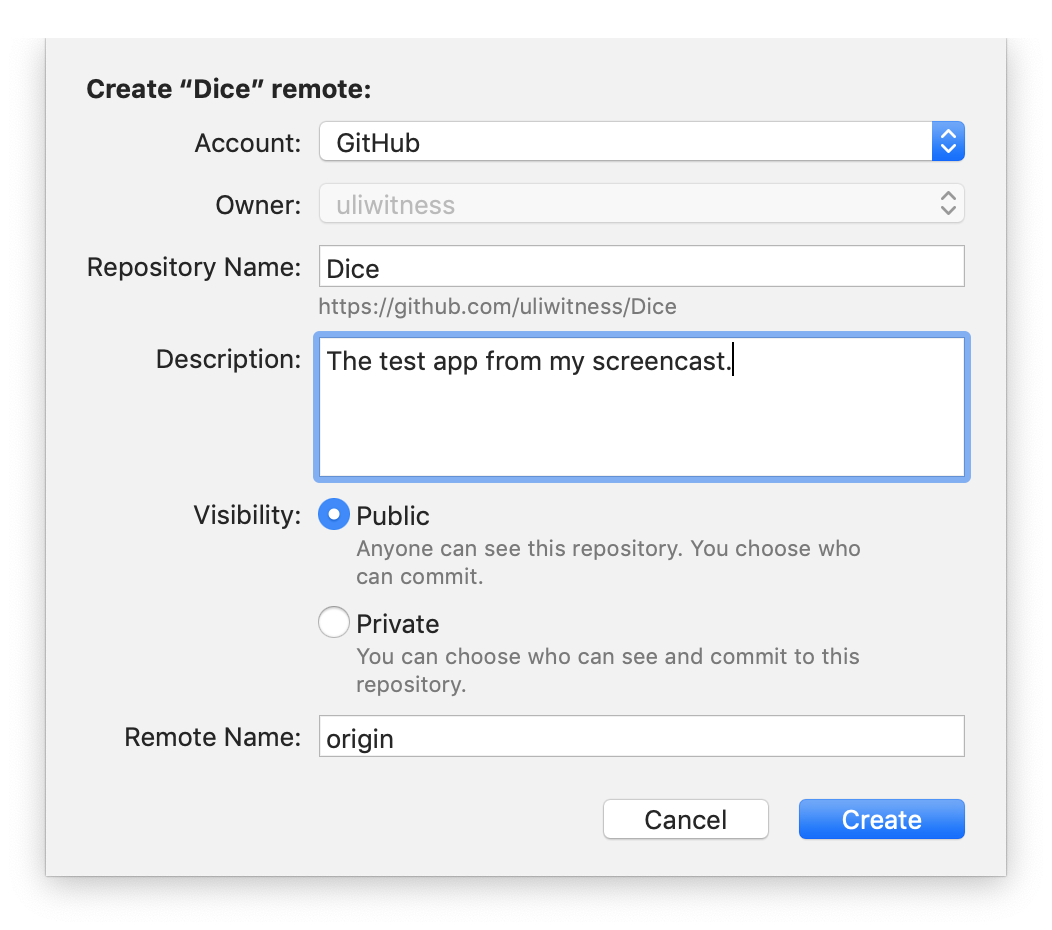
There, you can enter a name for the remote (e.g. “Github”, or origin, which is the usual convention) and for the repository that will be created:
Or if you’ve already created the repository on your server yourself (e.g. using a web interface), you can choose “Add Existing Remote…” instead and enter the Git repository’s address there:

So now we have a “remote”, basically a bookmark for our server to which Xcode can now upload our changes. For good measure, choose “Fetch and Update Status…” from the “Source Control” menu to have Xcode try and talk to the server. If your repository already had something in it, this would update the list of branches listed in the remote. Right now, the most it will likely do is tell you if you entered your password wrong.

Now, to actually do our first backup, choose Push… from the Source Control menu. A sheet will pop up, asking you what server and branch to push to:
The first time you do this for any branch, it will automatically create that branch for you on the server. From then on, the branch will show up under that remote in the Source Control navigator.
If you use source control to keep your code available across multiple computers, use the “Fetch and Update Status” menu item mentioned above to update your remote’s list of branches with branches you’ve added on another computer.
Restoring your Backup
A backup that you can’t restore isn’t worth a thing. Maybe you’re just setting up a new computer, whether voluntarily or because the old one is no longer usable or stolen. Maybe you just deleted your code folder with a runaway script. How do you get your code back from the off-site backup that is that server, now that you actually need that backup?
Easy. In Xcode’s welcome window, and in the “Source Control” menu, you can find the option to “Clone” a repository. If you have entered a type of account Xcode knows well, the resulting window will (eventually) show a list of all your repositories on that account’s server:
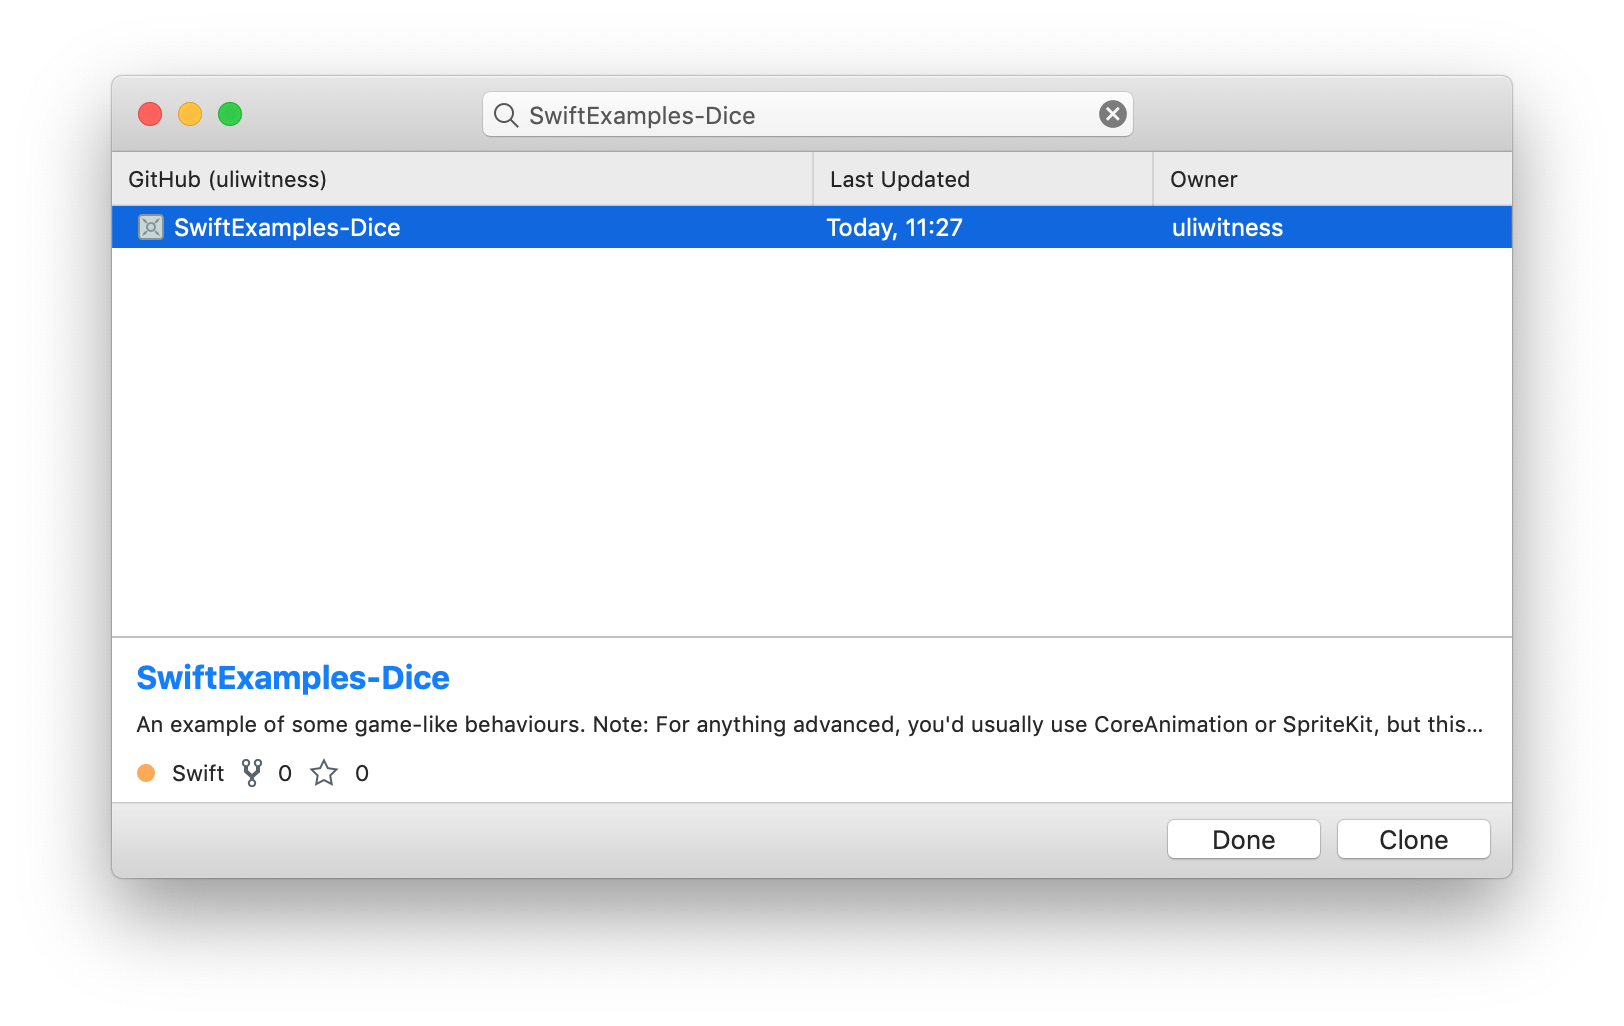
Either select one, or paste the URL for your Git repository into the search field and click “Clone”. You’ll be asked where you want to save the folder with the project and its files, and from then on it will be just like you created this repository on this computer to begin with.
Even better: Since Xcode knows where this repository came from, it automatically added a remote named origin for it to its Source Control navigator, which you can send your backups to. You don’t even need to add that bloody bookmark yourself anymore.
So Get Going!
I hope I’ve shown how easy it is to use source control, and how it replaces and speeds up several manual processes you would use to back up your code, create patches to older versions, manage code snippets or synchronise computers and provide a base level of documentation, and therefore reduces the number of mistakes and gotchas that can happen.
It also gives you more confidence and safety to experiment with your code.
Why don’t you try it?
Ten years after Why Everyone Needs Version Control, I thought it’s time to take a more practical approach at this topic.